A Quickstart Guide to the Webflow API


Webflow has become a popular way to build websites quickly without sacrificing quality. Since its launch in 2013, the platform has grown to more than 200,000 customers, including big names like HelloSign, Freshly, and Michael Kors.
While Webflow makes it easy to build pixel-perfect designs, many companies require connections with external tools and data sources. For example, they may manage their blog posts in Airtable or need to send form submissions to a CRM tool.
Let's look at how the Webflow API can help you integrate third-party tools and data sources with your Webflow site, along with some easy-to-use alternatives.
What is the Webflow API?
The Webflow CMS provides an HTTP JSON API that enables you to connect your Webflow site to external data sources. In particular, you can add, update, and delete items programmatically using a direct HTTP connection, the official JavaScript library, or third-party integrations in the language of your choice (such as Webflowpy for Python).
Webflow API provides access to several data models. Source: Webflow
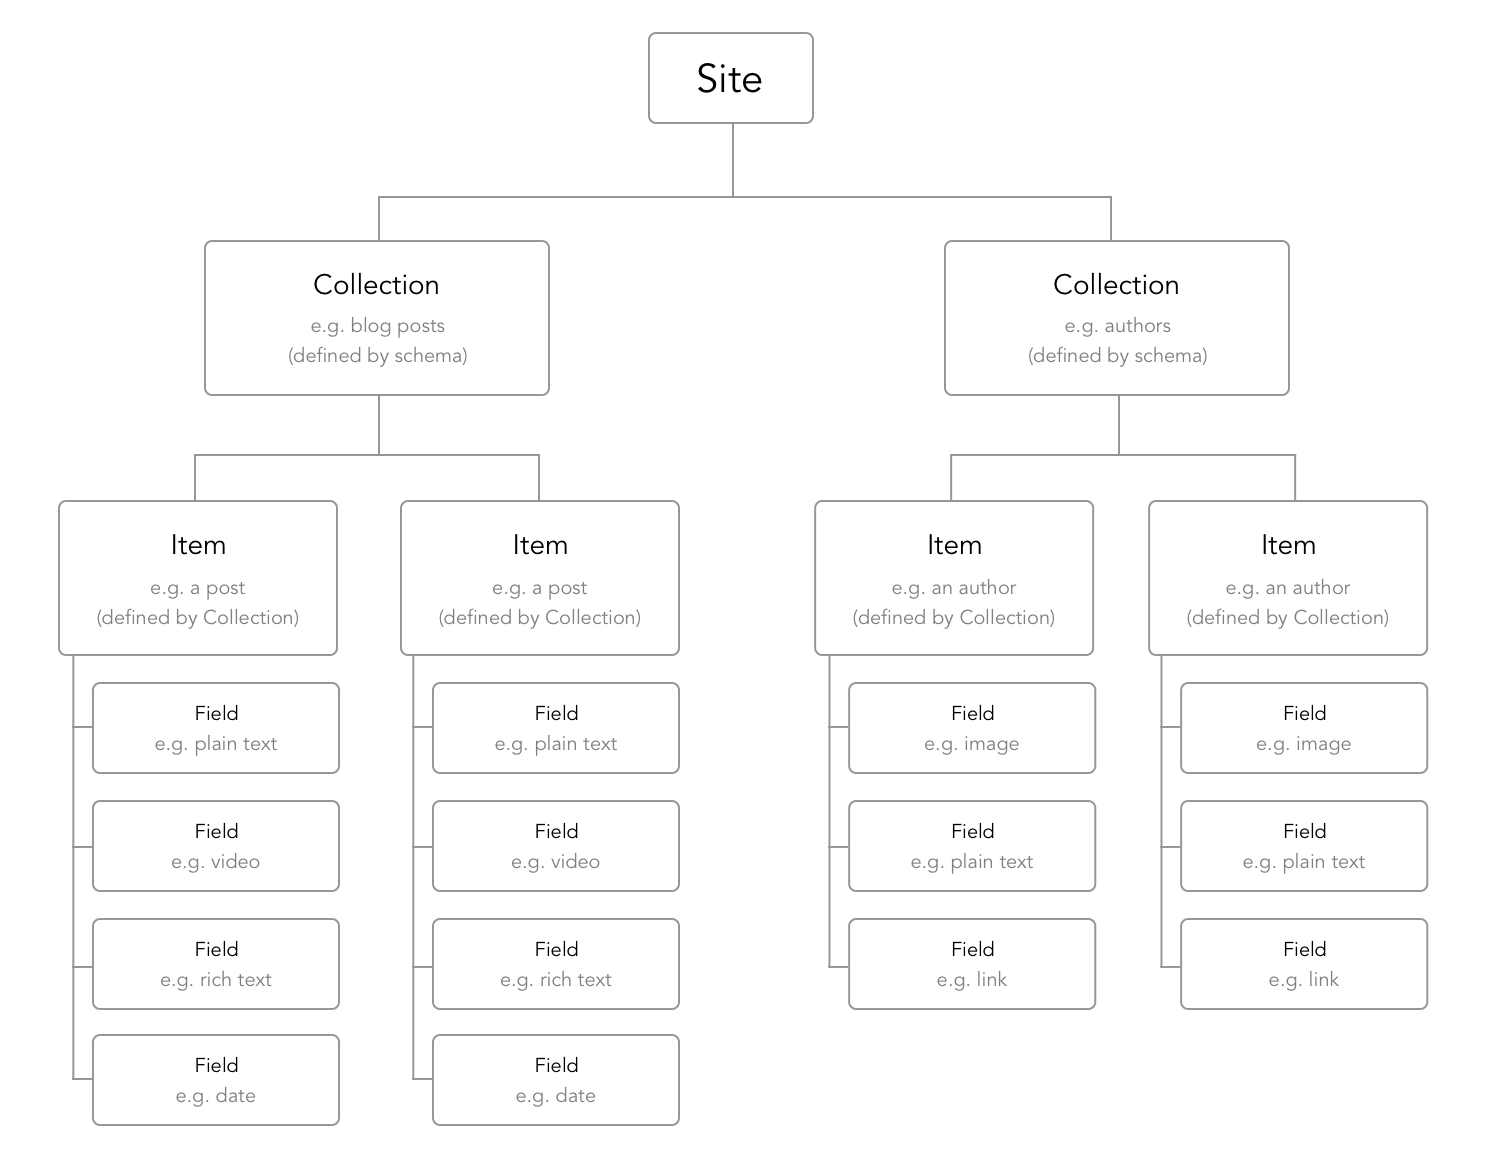
The Webflow API provides access to three resources:
- Sites - The Sites model lets you retrieve basic information about a Webflow website, like the name and preview URL.
- Collections - The Collections model represents groups of items that share a standard schema or set of fields.
- Items - The Items model represents each piece of content in a Collection. While you can only retrieve Sites and Collections data, you can create, update, or delete Items.
Before using the API, you’ll need to generate an API token to authenticate with Webflow and access your resources. You can do this by going to Project Settings > Integrations > Generate API token. After generating the API token, the best practice is to encrypt the key using a tool like git-secret that avoids exposing it in a public repo.
The official JavaScript client library provides straightforward access to the Webflow API. After installing the package with `npm install --save webflow-api`, you pass in your API token, and then you can access any of the API methods in the API documentation. You can toggle between "shell" and "javascript" examples in the documentation.
Here's an example of how to create a new Item:
```
const webflow = new Webflow({ token: api_token });
// Promise <Item>
const item = webflow.createItem({
collectionId: '580e63fc8c9a982ac9b8b745',
fields: {
'name': 'Exciting blog post title',
'slug': 'exciting-post',
'_archived': false,
'_draft': false,
'color': '#a98080',
'author': '580e640c8c9a982ac9b8b778',
'post-body': '<p>Blog post contents...</p>',
'post-summary': 'Summary of exciting blog post',
'main-image': '580e63fe8c9a982ac9b8b749',
},
});
item.then(i => console.log(i));
```
In addition to the basic CMS powering a blog, the Webflow API makes it easy to interact with Ecommerce Collections. Under the hood, these are just everyday Items with extra information. They also have predefined Collections, like SKUS, Products, and Categories. You can integrate your ecommerce tools with your Webflow website with these capabilities.
Finally, the Webflow API makes it easy to create Webhooks that kick off external services. For example, you may create a Webhook for a form submission that sends a message to a CRM tool to create a lead or support ticket. There are also custom Webhook trigger types for ecommerce orders and collection items.
Using Pipedream and Zapier
Pipedream and Zapier are two popular tools for managing APIs, without the headache. For example, if you want to convert a Webflow form submission into a CRM lead, you could create a webhook in Webflow that points to a CRM API endpoint. However, if these endpoints change or you want to manipulate the data, it becomes difficult to manage.
Zapier is the most accessible tool for the job. You can create "zaps" that stitch together different services with a single click. The interface abstracts away the complexity of APIs and JSON, enabling non-technical teams to build complex workflows. But, of course, the abstraction comes at the cost of customization—at least in the free tier.

Pipedream lets you define custom expressions. Source: Pipedream
Pipedream provides a more technical and flexible solution. In addition to stitching together services, you can add complex intermediary steps, such as a NodeJS code block that manipulates the data. For example, you might use conditional logic to determine the type of form submission from Webflow and direct it to create a lead or support ticket.
If you’re integrating the Webflow API with an internal service, Postman and Swagger are the two easiest tools for generating API client code snippets. For example, Postman’s Node.js code generator module converts any request into client code in your target language.
PowerImporter Makes It Easy
Many developers would prefer to avoid working directly with the Webflow API unless absolutely necessary. But, at the same time, Pipedream and Zapier don't handle many standard edge cases and have structural problems. For example, what happens if a "zap" misfires? And, how do you keep data in sync if there are users on both sides?
PowerImporter makes it easy to keep everything in sync by mapping fields between Webflow and external data sources. As a result, you can rest assured that the data is always in sync and up-to-date without worrying about edge cases or going over "zap" limits.
Currently, the platform supports:
- Airtable to Webflow Sync
- Enhanced CSV Imports
- WordPress to Webflow Sync (Coming Soon)
The Bottom Line
The Webflow API provides access to sites, collections, and items, enabling developers to build complex integrations with third-party or internal applications and data sources. But, of course, it's much easier to use off-the-shelf tools and avoid the added complexity.
If you need to manipulate data, Pipedream may be a good option to consider for maximum flexibility. But, if you need to simply keep data in sync, PowerImporter is the easiest solution that addresses the most common edge cases and keeps your website running smoothly.
Related posts
You might also be interested to read: